DIY Umbrella Chandelier
DIY Umbrella Chandelier:

What you'll need:
- an old umbrella or a very cheap one
- Spray Paint (White)
- Icicle Lights
- Wire
How to do it:
1. Grab your old umbrella and remove the fabric part.
2. Spray paint the umbrella's frame.
3. Wrap the icicle lights aroud the frame once it has dried. Secure the lights with tiny wires.
4. To hang the chandelier, hang it by the handle of the umbrella.
And finished!
Enjoy!
DIY Faux Taxidermy Deer
DIY Faux Taxidermy Deer:

What you'll need:
- Deer Template: number 1 number 2 number 3 number 4 number 5 number 6
- Cardboard or Foam Core
- X acto knife
- Pliers
- Pencil
- Paint Brush
- Paint or Spray Paint
- Metal Duct Tape (optional)
- Beer can tap
- E-6000 glue
You can find what you'll need listed below on Amazon:
Although the deer is painted in white, I prefer spray painting it in silver (it has more of a Christmas feel to it :) )
How to do it:

1. Cut out the template pieces, place them on the cardboard or foam core and trace it with a pencil.

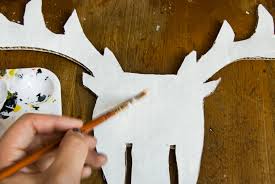
2. I wanted my deer to be white so then it would blend in with my mocha brown bedroom walls. So I painted it with white acrylic paint. It required three layers to look good.
You can use anything you want to personalize this project:
- spray paint
- collage
- watercolor
- wallpaper

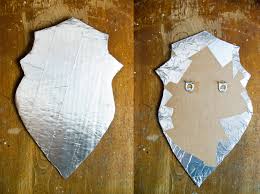
3. While I let it dry, I worked on the mounting board. For this I traced it myself.

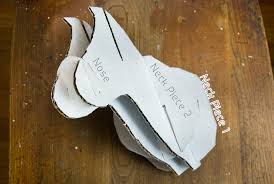
4. Once your templates have dried, you can assemble them.


5. I decided to glue all the pieces together so it would be sturdier this means I won't be able to take it apart if need be.

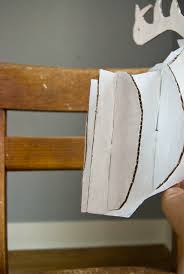
6. I also made sure my edges on the back were level, or it wouldn't sit level on the mounting board.

7. The two edges I just leveled out, I put a bead E-6000 glue on both of them. Then I positioned the deer head on the mounting board and pressed it down for about 1 minute. This will take 30 minutes to dry. When it has fiished drying, continue gluing the edges together making sure that it is secure.

And there you have it, your very own Faux Taxidermy Deer ready to be hung on the wall and it's a whole less scary than the real thing.
Enjoy!
https://madtowngals.wordpress.com/2012/08/21/faux-taxidermy-deer-diy/

What you'll need:
- Deer Template: number 1 number 2 number 3 number 4 number 5 number 6
- Cardboard or Foam Core
- X acto knife
- Pliers
- Pencil
- Paint Brush
- Paint or Spray Paint
- Metal Duct Tape (optional)
- Beer can tap
- E-6000 glue
You can find what you'll need listed below on Amazon:
Although the deer is painted in white, I prefer spray painting it in silver (it has more of a Christmas feel to it :) )
How to do it:
1. Cut out the template pieces, place them on the cardboard or foam core and trace it with a pencil.
2. I wanted my deer to be white so then it would blend in with my mocha brown bedroom walls. So I painted it with white acrylic paint. It required three layers to look good.
You can use anything you want to personalize this project:
- spray paint
- collage
- watercolor
- wallpaper
3. While I let it dry, I worked on the mounting board. For this I traced it myself.
4. Once your templates have dried, you can assemble them.
5. I decided to glue all the pieces together so it would be sturdier this means I won't be able to take it apart if need be.
6. I also made sure my edges on the back were level, or it wouldn't sit level on the mounting board.
7. The two edges I just leveled out, I put a bead E-6000 glue on both of them. Then I positioned the deer head on the mounting board and pressed it down for about 1 minute. This will take 30 minutes to dry. When it has fiished drying, continue gluing the edges together making sure that it is secure.
And there you have it, your very own Faux Taxidermy Deer ready to be hung on the wall and it's a whole less scary than the real thing.
Enjoy!
https://madtowngals.wordpress.com/2012/08/21/faux-taxidermy-deer-diy/
Get The Look: Pretty Little Liars
Subscribe to:
Comments (Atom)
