Hanging Flowers

Hanging Flowers:

What you'll need:

- flowers
- mason jars
- rope
- thick wire

How to do it:

1. Grab your mason jars and attach the wire around it creating a hook.

2. Now, attach the rope to the hook and hang it to the ceiling or wherever you want.

3. Grab your bunch of flowers and add them to the mason jars.

DIY – hanging flower mason jars


Enjoy!

Wooden Boards with Wallpaper

Wooden Boards with Wallpaper:

Rococo Style Stretched Canvas

What you'll need:

- wooden boards
- wallpaper
- sandpaper

How to do it:

1. Apply wallpaper to your wooden boards.
2. Take Sandpaper to it.

This would be a great DIY on any wood project, tables, benches, chairs, picture frames, even a floor that you would satin varnish over it.

Rococo Style 3 Art Print

Lady Rococo Art Print

Enjoy!

Homemade Smartphone Projector

Homemade Smartphone Projector:

What you'll need:

- a shoe box
- a magnifying glass
- tape
- a pencil
- exacto knife
- a paperclip

How to do it:

funny-smartphone-projector-homemade

Enjoy!

Vintage Marquee DIY

Vintage Marquee DIY:

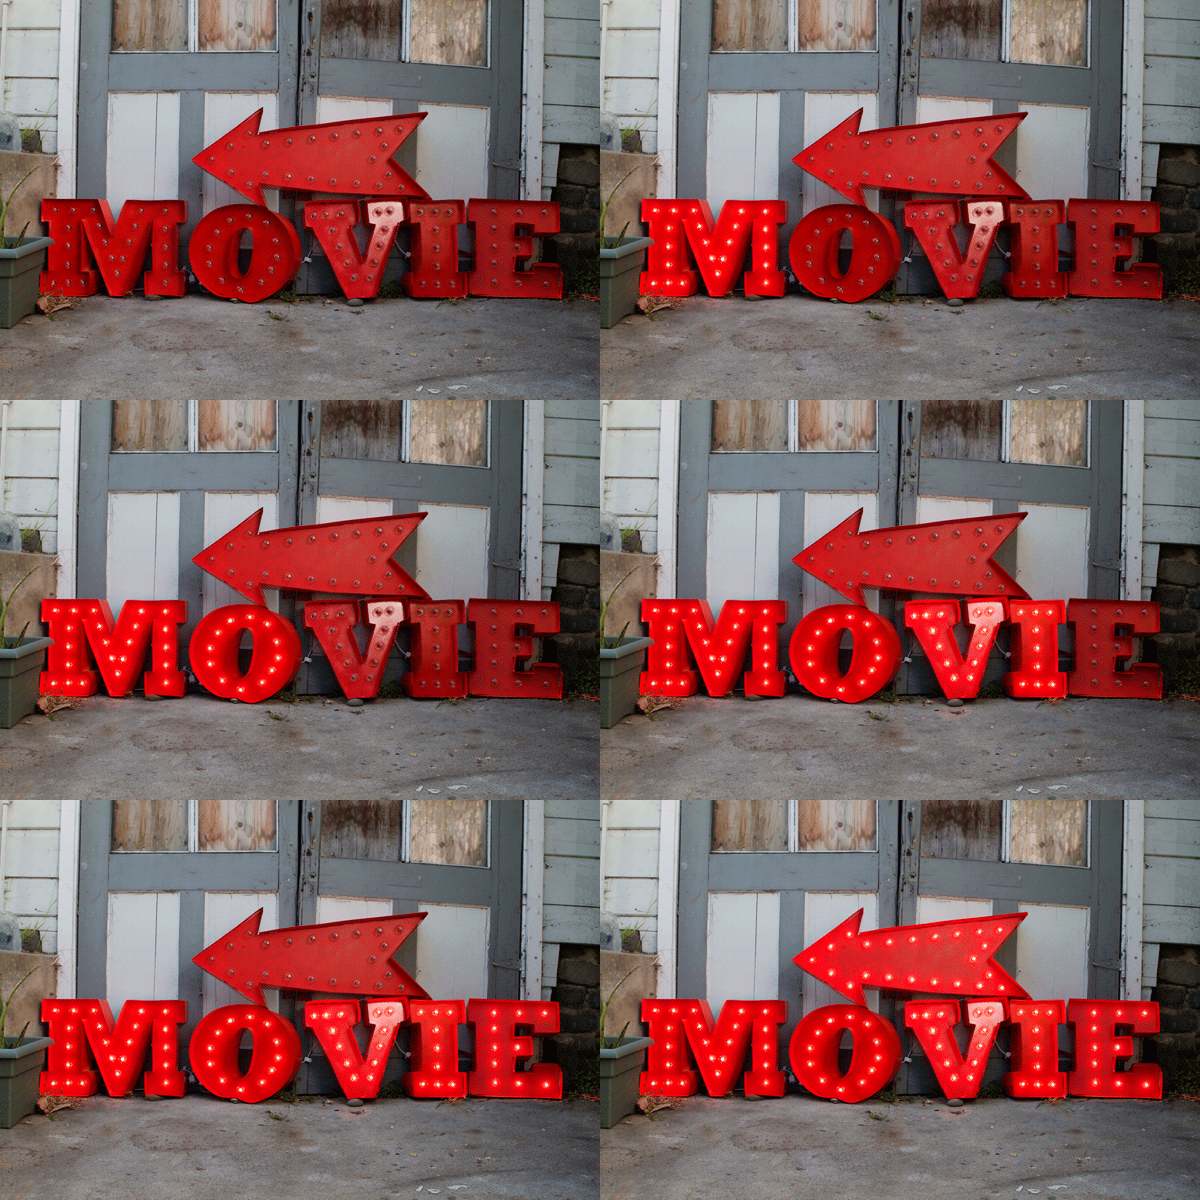
When we were brainstorming ideas for movie night decorations we kept coming back to vintage marquees and movies signs. So we put together this DIY using foam core and poster board. This would be awesome in a driveway or on the front of a house telling people where the movie night is. 


What you'll need:

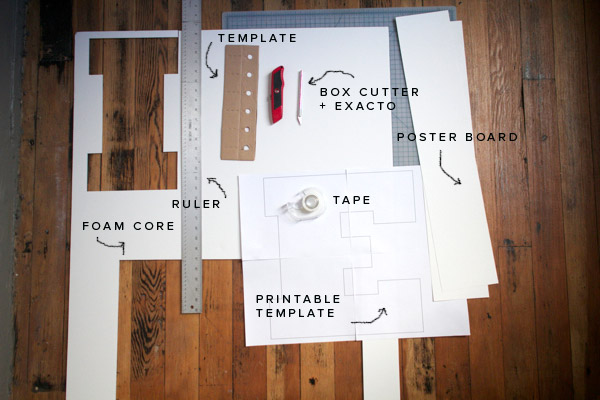
 - 1/8″ Foamcore
- Box Cutter
- Exacto
- Poster Board
- Free Printable template (download here)
- scotch tape
- packing tape
- ruler
- string of lights (take the box apart for the circle template)
- spray paint


How to do it:

1.  Download the free template It has the word “MOVIE” and an arrow. Tape the letters together and lay them on the foamcore.

2. Cut out the the letter using the template as the guide. Go over the cuts until the letter is cut out.

3. Turn the letter over so the backside is facing up and draw a line down the center of the letter.


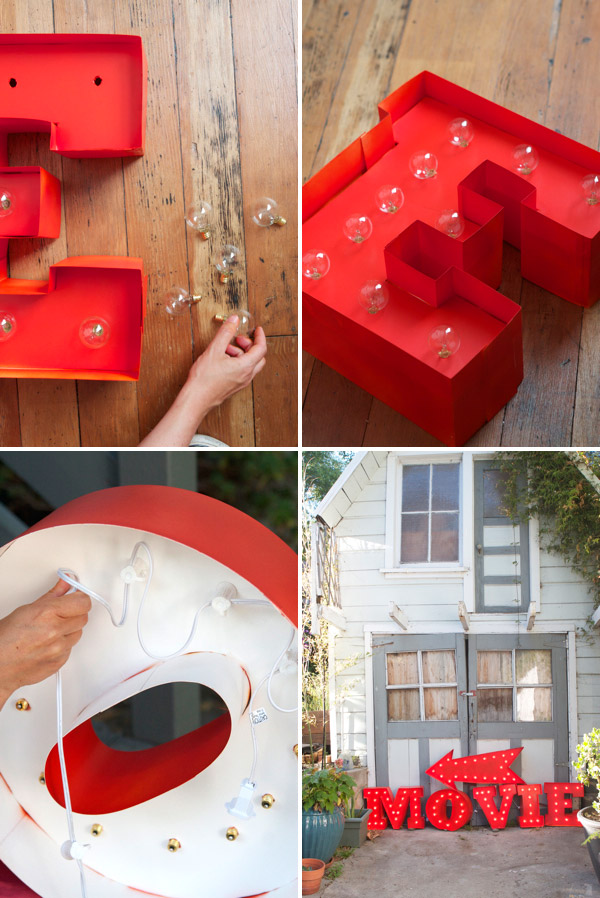
4. Using the box the lights came in as a template, draw the holes a few inches apart. This is where the lightbulbs will go through.


5. With an exacto knife, cut out the circles.


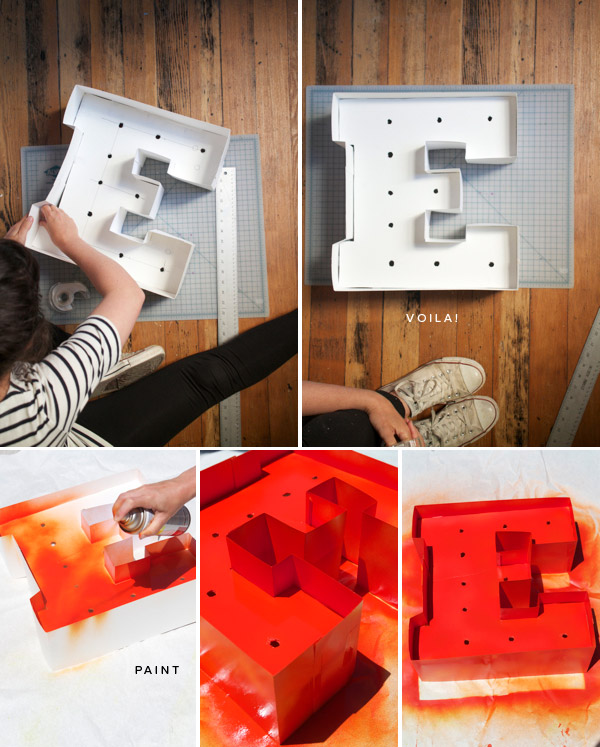
6. Cut a poster board into 5.5″ strips. These will go around each letter and will help them to stand.


7.  To attach the liners we used scotch tape. We liked how it looked when the face sat 2″ deep into the liner. The secret to getting good looking letters is to score the poster board before you bend it to get nice sharp creases. Once you’ve scored and bent all the folds begin taping in the foam core from behind about 2″ down the poster board. Make sure the tape is secure and reinforce it until it feels sturdy. We reinforced ours from behind with packing tape.


8. Spray paint the letters your color of choice. We painted ours a nice orange-y red. Let it dry.


9. Put the lightbulbs in the holes and then screw them into the sockets from behind. Make sure they are screwed in all the way or they won’t light up. We should note that if you are missing a lightbulb the other lights in the strand still work. Plug the lights in and that’s it!  You have a pretty sign for your event.


Enjoy!

DIY Instax Wallpaper

DIY Instax Wallpaper

What you'll need:
- Instagram Photos
- Card Stock
- Sheets
- Staple Gun
- A big wall
- time and patience

How we made our instax photo wall
How to do it:
1. We designed 11x17 inch images with 9 Instax wide sized photos per sheet. We then created 4 different sheets with different photos. You could always do more if you wanted to reduce repeat photos! We measured the wall and ordered about 130 sheets on 80 lb card stock. We found an inexpensive local printer that did them for around $1 per sheet, so the entire wall only cost about $130! We got the sheets printed and trimmed. 
2. Next, we adhered them to the wall. We started with just sturdy double sided tape strips. This didn't work for our wall, so we started using a staple gun. Obviously, someday we will have a lot of staples to pull, but I am ok with that. I plan to keep this wall up for a couple years, so It was worth it to me. If you have satin paint you may not need a staple gun. 
3. So, we adhered and stapled the sheets to the wall. We had to cut some to fill in the leftover space around the edges of the wall at the end. This took an entire afternoon with Katie and Kinsey cutting and stapling. Not bad considering the size of this wall!  

Add real photos

Add real photos

4. Now that it is fully installed I will be covering some of the repeated photos with real Instax photos.

DIY Instax Wall via A Beautiful Mess
Ta-Da! Here's a photo of the finished product! I am super thrilled with the outcome. It has so much personality.

DIY Instax Wall (A Beautiful Mess)

DIY Instax Wallpaper

Enjoy!

DIY Canvas Map

DIY Canvas Map:

YES.Lay a world map over 3 canvas (foam core would be cheaper), cut into 3 pieces. Coat each canvas with Mod Podge and wrap the maps around them like presents. Let dry and hang on the wall about 2" away from each other. Then add pins to all the places you've been.

What you'll need:
- 3 Canvas
- a map (big enough to cover all three canvas)
- Spray Adhesive (Mod Podge if necessary)
- Pins (optional)

How to do it:

1. Lay the map over the 3 canvases and cut it into 3 pieces. You may also want to cut off the ugly border if you so choose.


2. Spray the canvas with spray adhesive and smooth the map over it evenly. Wrap the sides like a present, using spray adhesive to seal them. *I used Mod Podge in my project and I don’t recommend it. It made the map bubble and warp from the liquid. I used spray adhesive on a recent project and it works way better with no warping or bleeding through.
3. Let dry and hang on the wall with about 2″ of space in between each piece. Use the sewing pins to mark where you and your family have traveled.
IMG_3958
 IMG_3960
Bon Voyage!
Enjoy!

Instagram Coasters

Instagram Coasters:

As our iPhone libraries begin to overflow, we're always on the search for practical, tangible uses for our Instagram snaps. These D.I.Y. coasters will remind you all of your latest outdoor adventure/ music festival outing/ seafaring weekend. 

What You'll Need: 
-4-inch round, flat cork pieces 
-Modge Podge glue 
-Card stock paper 
-Instagram print-outs 
-Foam or felt mounting dots


DIY Coasters!

How to do it:

1. Using the cork piece, trace a circle onto the card stock and the picture print to make sure the size of the materials match.
2. Spread a thin layer of the Modge Podge onto the cork, then place the card stock on top.
3. Do the same with your Instagram shot, and seal with another thin layer of the glue.
4. Stick four mounting dots on the back.
Enjoy!

DIY Temporary Tattoo

DIY Temporary Tattoo:

What you'll need:


- Wet Cloth
- Talcum Powder
- Eyeliner
- Makeup Brush
- Ethyl Alcohol
- Cotton Pads
- Liquid Bandage Spay


How to do it:


1. First you’ll need a drawing or word/phrase. In this case, I’ll be drawing the Deathly Hallows sign from Harry Potter. Draw it on the tracing paper (making sure it’s the size you want) and cut it.


2. Scrub your skin with ethyl alcohol where you’ll be doing your tattoo and put the tracing paper over it (with the drawing facing down).


3. With the wet cloth, pressure the drawing against the skin. Remove the tracing paper and you should have an outline of the drawing on your skin.

4. Draw the tattoo with eyeliner. Wait a few seconds, then put a bit a talcum powder over the drawing and spread it around with the brush.

5. Again, wait a few seconds and then spray the drawing with the liquid bandage spray.Make sure it covers the entire area of the tattoo and let it dry. As you can see it is waterproof!


Enjoy!

Galaxy Nails Tutorial

Galaxy Nails Tutorial:


What's better than having the universe on your digits? This is one of my favourite manicure to date!

What you'll need:
1. 1 makeup sponge (the finer texture the better)
2. 1 Qtip
3. Polish Remover (for cleanup)

Polishes:

- Coral Colors Nail Polish: Pure ice Spitfire, Kiss Nail Artist "White", Revlon Sunshine Sparkle, Covergirl My Papaya, Soo Nails Purple, Sinful Colors Dream On, Seche vite

+ Topcoat


- Blue Colors Nail Polish:  Kiss Nail Artist, Revlon Midnight Sparkle, Salon Perfect, Sparkling Sapphire, Revlon Superstitious, Sinful Colors Dream On, Soo Nails, Pure Ice, Spitfire, Seche Vite

+ Topcoat


Coral Hue Galaxy Nails: 
1. The main idea behind this coral hue galaxy is to seamlessly blend the light white areas with the dark pink background color. 
2.  Keep your polish relatively light and use the pointed tip of your sponge.  Begin by sponging a white base followed by a light purple and coral to blend.  
3. Add a yellow color in the middle of white area, to symbolize the center of the cosmic dust.  
4. Sponge an iridescent blue nail polish around the edges of your nail to add more depth and create contrast.  
5. Paint a supernova (starburst) by starting your lines from the center and dragging out; this will make the lines get thinner towards the ends, making them look as part of the universe and not  clunky. 
6. Add glitter and concentrate it around the cosmic dust to not overwhelm the design.


Blue Galaxy Nails:
1. Begin by painting a dark base as the main galaxy color (black nail polish, indigo nail polish, etc). 
2. The main idea for this blue toned galaxy is to blend the light colored cosmic dust with this dark background.  Use purple, dark magenta, and blue to achieve this effect.  
3. Keep the center of the cosmic dust the lightest, brightest white to imitate light.  
4. Paint a planet by dipping a Q tip in your light blue and twisting it in place to achieve a sphere. 
5.  Repeat the action with a darker color on top to give dimension to the planet; finish it off by adding white around its edges as if it's illuminated. 
6. Concentrate glitter polish around the cosmic dust and top off with your favorite topcoat.


Voila!

Enjoy!

Stacked-Books Table Lamp

Stacked-Books Table Lamp:

Dan Faires rRcycles Old Books Into Lamp

I'm in love with books and nothing would make me happier than having a book lamp by my side while I read, so i found this really cool idea at http://www.hgtv.com. So here are the instructions:

What you'll need:

  • old hardcover books, about 8
  • lamp kit
  • lamp shade
  • spray paint
  • drill
  • 1/2" drill bit
  • razor blade or box cutter
  • 1-1/4" screws
  • 2" screws
  • screwdriver

How to do it:


1. Spray paint lamp fittings to desired color, and allow it to dry.
Step 1 Dan Faires Recycles Old Books Into Lamp+


2. Stack and arrange the old hardcover books. Place the lamp's threaded rod next to book stack and make sure there is one inch of clearance on the top for the remaining lamp assembly.
Step 2 Dan Faires Recycles Old Books Into Lamp+


3. Clamp down the bottom book to the table, and using a half-inch drill bit, drill a hole in the center of the book about halfway down.

  • Step 3 Dan Faires Recycles Old Books Into Lamp


4. Open the base book. Using a razor blade or box cutter, cut a channel where the electrical cord will be placed. Make sure it matches the width and thickness of the cord.


5. Use the washer and lock nut from the lamp kit to attach the threaded rod to the base book. Close the book and tighten down the top lock nut.
Step 7 Dan Faires Recycles Old Books Into Lamp+


6. Entering from the bottom, slide the electrical wire through the threaded rod. Leave 1-1/2 to two inches of electrical wire at the top of the threaded rod so you can attach the lamp parts. Drill 1-1/4-inch screws to secure the book to itself. Use four to six screws, making sure to avoid the electrical wire.
Step 8 Dan Faires Recycles Old Books Into Lamp

7. Clamp down and use the half-inch drill bit to drill a hole in the center of each book. Slide the books, one by one, through the threaded rod, drilling four 2-inch screws to secure each book to the book beneath it.


8. On the top book, open the cover, and secure it with four 2-inch screws.
Step 11 Dan Faires Recycles Old Books Into Lamp+


9. Assemble the lamp kit parts, according to the manufacturer's instructions. Attach the lamp shade.
Step 12 Dan Faires Recycles Old Books Into Lamp

Enjoy!
Shop SheIn for the latest in Fall and Winter Fashions