DIY Mustache Bookmark

DIY Mustache Bookmark:


What you'll need:
- Mustache Template
- Square piece of paper
- Triangular paper (half of the square)
- Glue


How to do it:
1. First print out whatever mustache you want.


2. Cut a square paper and a triangular paper. For the triangular one, it should be half of the square one. Add a little extra for the edges.


3. Stick the triangular paper to the square one by adding the glue on the extra edges.


4. Lastly glue your mustache to the corner bookmark.


Voila! This would be a super great bookmark if you are an Hercule Poirot Fan!


Enjoy!

DIY Inspiration: Wool Plaid Mini Skirt

DIY Inspiration:

I found this really cute skirt and have been looking around for a tutorial to share with you. Here is the picture.
I just love how chic it is, don't you?

DIY Inspiration: Urban Renewal Wool Plaid Mini Skirt with elastic band

Unfortunately, I haven't found a tutorial yet but found one that is pretty close: http://lladybird.com/2012/01/30/completed-giant-plaid-circle-skirt/

If you find a tutorial for this skirt or even have a tutorial of your own please share it with us by leaving a comment below!

Thank you!

DIY Mini Hats!

DIY Mini Hats:


I've always been the type of person to keep useless objects around the house (hoarder!) such as bottle caps and I've finally come up with a great way of reusing them! Not such a dumb idea keeping them! Lately I've been obsessing over Alice in Wonderland and all things mini. So I thought why not create tiny little hats! It's so simple and I had everything I needed at home! Here is how to do it:

What you'll need:
- bottle caps
- cardboard paper
- glue gun
- anything to decorate (ribbons, feathers, buttons...)
- black paint (spray paint or acrylic paint)


How to do it:

1. With your cardboard cut out a circle then paint your circle and bottle cap black like the picture above. I used Acrylic because I didn't have any spray paint.


2. Once your bottle cap and circle have dried, glue them together with the hot glue gun so they form a hat.


3. When they are properly glued together, you can choose how to decorate them. I wrapped a ribbon around it and added a bit of black lace to the top of the hat.


 4. I "smooshed" the tulle together and glued it where both ends of my ribbon meet.


5. I then added a little mad hatter touch to it.


Voila! This definitely deserves a 10/6!


You could also continue this by adding the hat to a bobby pin!

Enjoy!

DIY Book Clock

DIY Book Clock:

DIY book clock 01

What you'll need:

- an old book
- clock mechanism
- exacto
- hammer
- nail

DIY clock book

How to do it:

DIY book clock 07

1. Grab your book and on the first page draw the outline of your clock mechanism.


2. With your exacto knife, cut into a few pages until your clock mechanism fits.

DIY book clock 01

3. Start adding the handles. For that, make a hole in the cover of the book using the nail and the hammer.
The middle section of your clock mechanism where you will attach the handles to should now be poking out of the cover. Attach your handles.

DIY book clock 01

DIY book clock 01

Now that it's all set you can choose to hang it to a wall or just display it on a bedside table. It's up to you!

Enjoy!

Decorated Wooden Magazine Holder

Decorated Wooden Magazine Holder:


I was looking around my room and saw these boring wooden magazine holders sitting on my shelves and thought that maybe I could make them seem more lively and fun and since i'm so into chevron, I decided to apply it to the magazine holders. So look around your room, maybe some dull wooden magazine holders are waiting for you to give them a makeover.

What you'll need:

- wooden magazine holder
- paint ( I chose yellowish green, yellow, opera pink and sky blue)
- tape
- newspaper

How to do it:

1. Grab your wooden magazine holder.


2. Create the pattern you want with your tape and stick it to the magazine holder.
If you decide to go with a chevron pattern, it should look like the picture below.


3. After, you can choose how to apply your paint. I started splatting the paint all over the magazine holder and with my fingers blended the colors in. Make sure to protect your floor with newspaper.


 I decorated my wooden magazine holder three different ways. One chevron, one with stripes and the last one with paint dripping.


Enjoy!
Hanging Flowers

Hanging Flowers:

What you'll need:

- flowers
- mason jars
- rope
- thick wire

How to do it:

1. Grab your mason jars and attach the wire around it creating a hook.

2. Now, attach the rope to the hook and hang it to the ceiling or wherever you want.

3. Grab your bunch of flowers and add them to the mason jars.

DIY – hanging flower mason jars


Enjoy!
Wooden Boards with Wallpaper

Wooden Boards with Wallpaper:

Rococo Style Stretched Canvas

What you'll need:

- wooden boards
- wallpaper
- sandpaper

How to do it:

1. Apply wallpaper to your wooden boards.
2. Take Sandpaper to it.

This would be a great DIY on any wood project, tables, benches, chairs, picture frames, even a floor that you would satin varnish over it.

Rococo Style 3 Art Print

Lady Rococo Art Print

Enjoy!

Homemade Smartphone Projector

Homemade Smartphone Projector:

What you'll need:

- a shoe box
- a magnifying glass
- tape
- a pencil
- exacto knife
- a paperclip

How to do it:

funny-smartphone-projector-homemade

Enjoy!
Vintage Marquee DIY

Vintage Marquee DIY:

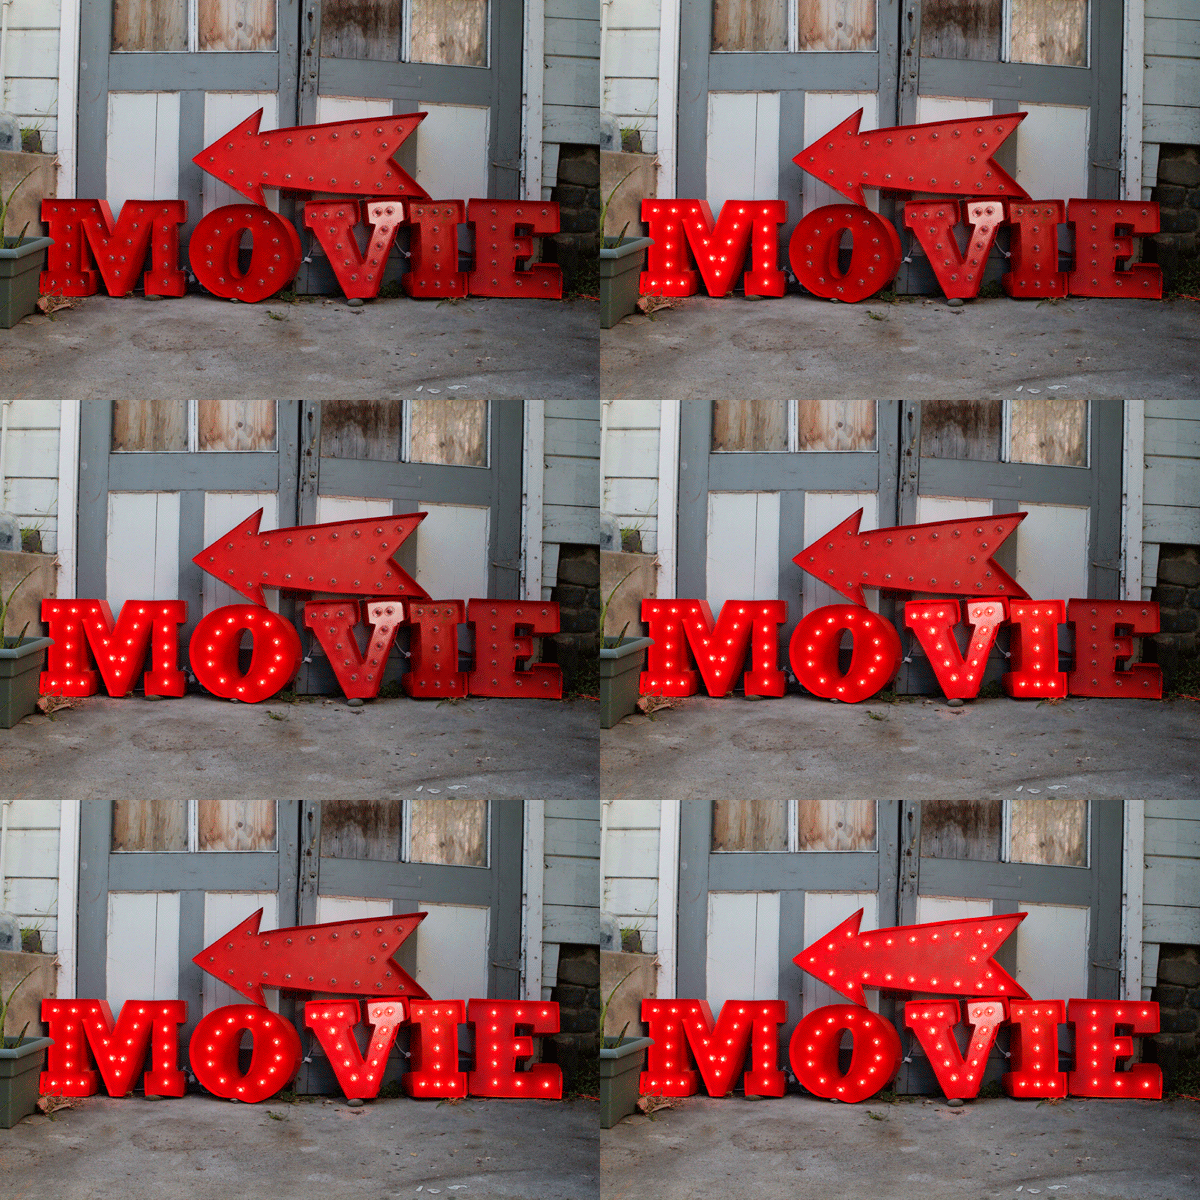
When we were brainstorming ideas for movie night decorations we kept coming back to vintage marquees and movies signs. So we put together this DIY using foam core and poster board. This would be awesome in a driveway or on the front of a house telling people where the movie night is. 


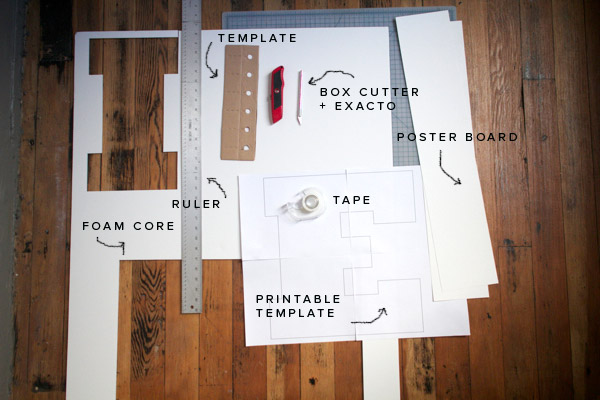
What you'll need:

 - 1/8″ Foamcore
- Box Cutter
- Exacto
- Poster Board
Free Printable template (download here)
- scotch tape
- packing tape
- ruler
string of lights (take the box apart for the circle template)
- spray paint


How to do it:

1.  Download the free template It has the word “MOVIE” and an arrow. Tape the letters together and lay them on the foamcore.

2. Cut out the the letter using the template as the guide. Go over the cuts until the letter is cut out.

3. Turn the letter over so the backside is facing up and draw a line down the center of the letter.


4. Using the box the lights came in as a template, draw the holes a few inches apart. This is where the lightbulbs will go through.


5. With an exacto knife, cut out the circles.


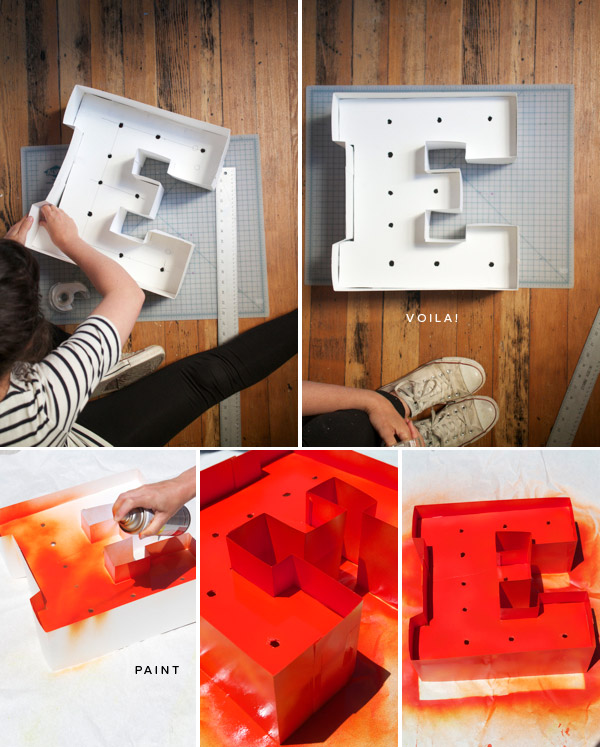
6. Cut a poster board into 5.5″ strips. These will go around each letter and will help them to stand.


7.  To attach the liners we used scotch tape. We liked how it looked when the face sat 2″ deep into the liner. The secret to getting good looking letters is to score the poster board before you bend it to get nice sharp creases. Once you’ve scored and bent all the folds begin taping in the foam core from behind about 2″ down the poster board. Make sure the tape is secure and reinforce it until it feels sturdy. We reinforced ours from behind with packing tape.


8. Spray paint the letters your color of choice. We painted ours a nice orange-y red. Let it dry.


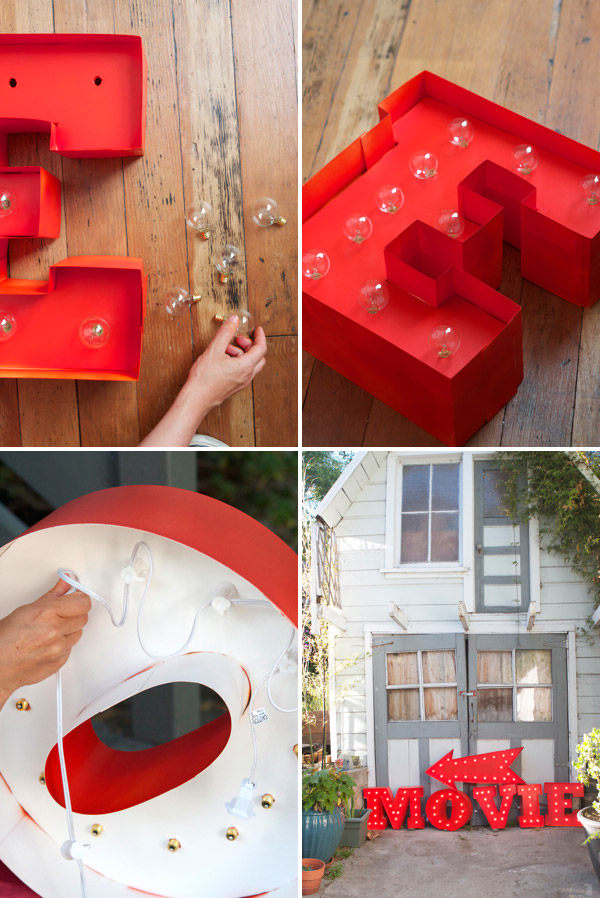
9. Put the lightbulbs in the holes and then screw them into the sockets from behind. Make sure they are screwed in all the way or they won’t light up. We should note that if you are missing a lightbulb the other lights in the strand still work. Plug the lights in and that’s it!  You have a pretty sign for your event.


Enjoy!
DIY Instax Wallpaper

DIY Instax Wallpaper

What you'll need:
- Instagram Photos
- Card Stock
- Sheets
- Staple Gun
- A big wall
- time and patience

How we made our instax photo wall
How to do it:
1. We designed 11x17 inch images with 9 Instax wide sized photos per sheet. We then created 4 different sheets with different photos. You could always do more if you wanted to reduce repeat photos! We measured the wall and ordered about 130 sheets on 80 lb card stock. We found an inexpensive local printer that did them for around $1 per sheet, so the entire wall only cost about $130! We got the sheets printed and trimmed. 
2. Next, we adhered them to the wall. We started with just sturdy double sided tape strips. This didn't work for our wall, so we started using a staple gun. Obviously, someday we will have a lot of staples to pull, but I am ok with that. I plan to keep this wall up for a couple years, so It was worth it to me. If you have satin paint you may not need a staple gun. 
3. So, we adhered and stapled the sheets to the wall. We had to cut some to fill in the leftover space around the edges of the wall at the end. This took an entire afternoon with Katie and Kinsey cutting and stapling. Not bad considering the size of this wall!  

Add real photos

Add real photos

4. Now that it is fully installed I will be covering some of the repeated photos with real Instax photos.

DIY Instax Wall via A Beautiful Mess
Ta-Da! Here's a photo of the finished product! I am super thrilled with the outcome. It has so much personality.

DIY Instax Wall (A Beautiful Mess)

DIY Instax Wallpaper

Enjoy!

DIY Canvas Map

DIY Canvas Map:

YES.Lay a world map over 3 canvas (foam core would be cheaper), cut into 3 pieces. Coat each canvas with Mod Podge and wrap the maps around them like presents. Let dry and hang on the wall about 2" away from each other. Then add pins to all the places you've been.

What you'll need:
- 3 Canvas
- a map (big enough to cover all three canvas)
- Spray Adhesive (Mod Podge if necessary)
- Pins (optional)

How to do it:

1. Lay the map over the 3 canvases and cut it into 3 pieces. You may also want to cut off the ugly border if you so choose.


2. Spray the canvas with spray adhesive and smooth the map over it evenly. Wrap the sides like a present, using spray adhesive to seal them. *I used Mod Podge in my project and I don’t recommend it. It made the map bubble and warp from the liquid. I used spray adhesive on a recent project and it works way better with no warping or bleeding through.
3. Let dry and hang on the wall with about 2″ of space in between each piece. Use the sewing pins to mark where you and your family have traveled.
IMG_3958
 IMG_3960
Bon Voyage!
Enjoy!
Shop SheIn for the latest in Fall and Winter Fashions