Aged/Peeling Paint Technique

Aged/Peeling Paint Technique:


We all know that a new coat of paint can completely transform a good second hand find into a GREAT find! and paint is so easy too!!!

To get that old or aged look in a "newer" item, I wanted to share a little technique I learned.

What you'll need:

Object to be painted
- Paint
- Brush
- Bar of Soap (needs to be a pure soap like Dove or Ivory)
- Sandpaper

How to do it:

The soap creates a "waxy" layer that helps the paint to be sanded off easier to reveal the color or material underneath of it. Normally the edges are sanded to give some contrast to an object but this technique allows you to create more interest and age in your projects.

1. Determine how many layers (colors) you will have and if there are certain places that you will want the paint to be sanded off.
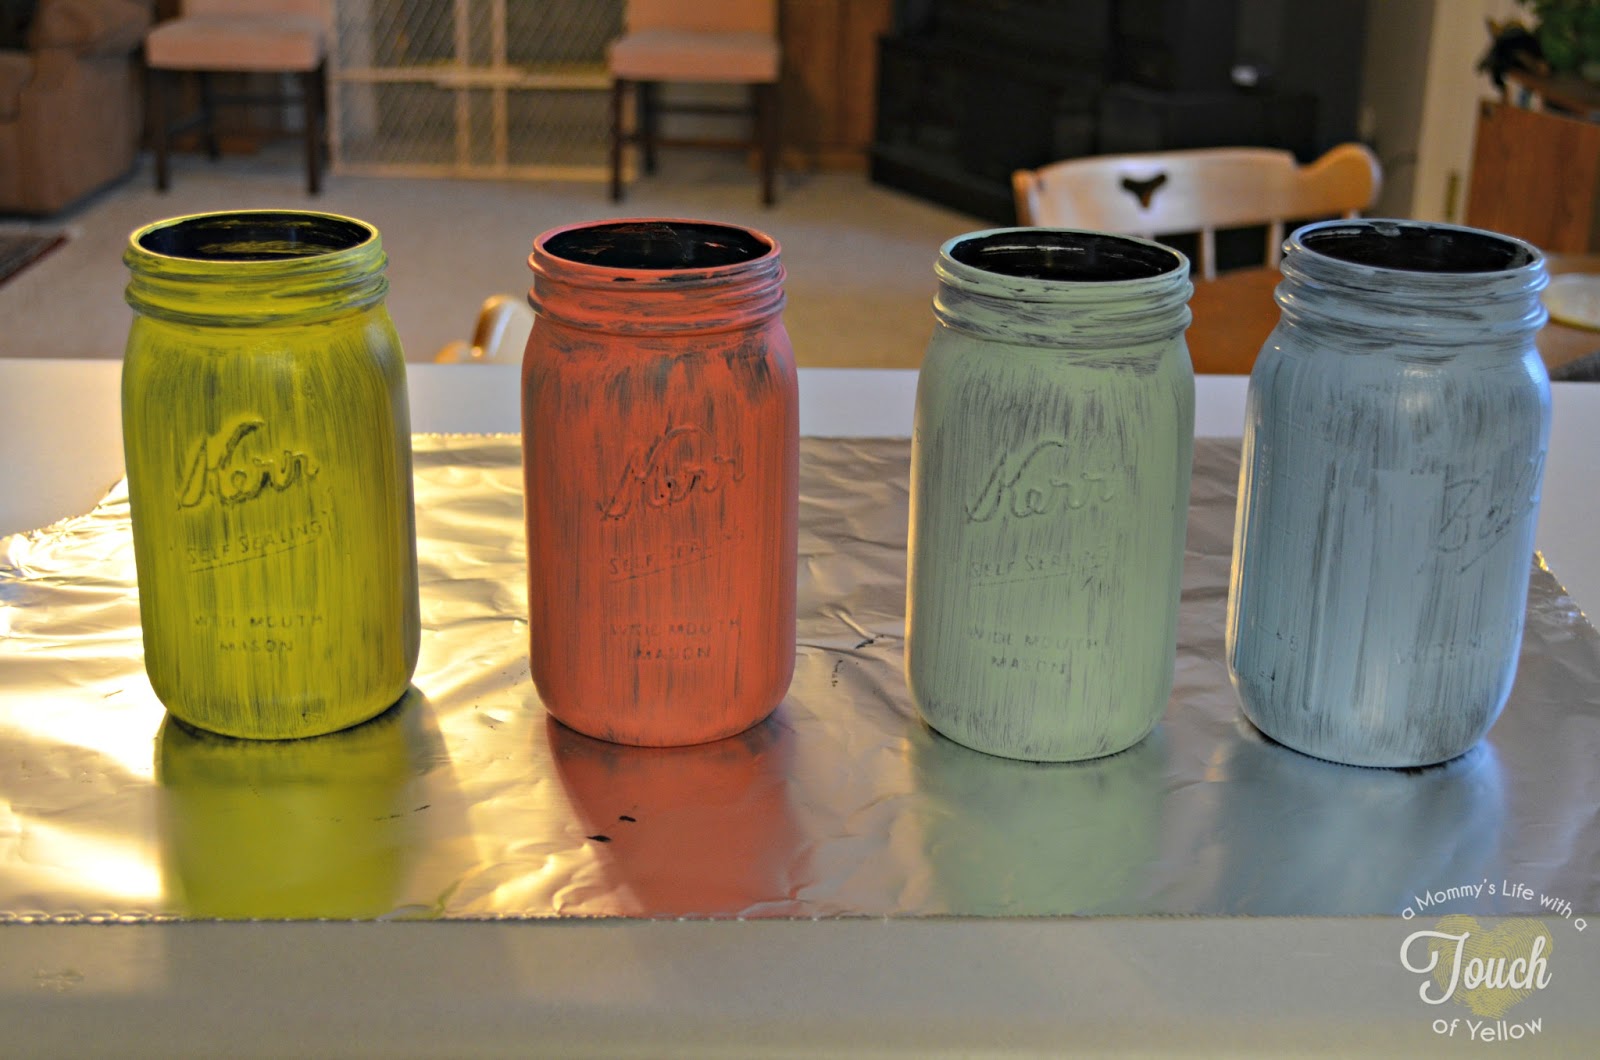
I chose to work with 3 colors for my project. I applied a base coat (brown color) to this large wooden letter. Once it was dry I applied a thick layer of the soap in certain areas and then applied a second layer of paint (mustard color) on top of the that.


2. If you don't sand that layers as you go, then be sure to apply the soap in the same area on top of the new coat of paint that you did with the first layer. I wasn't sure the look I wanted and how much of each color I would use, so I sanded to my first layer (brown) through the second layer (mustard).


3. Then I applied the last color (blue) leaving the areas I had already sanded exposed.


4. When my top coat was dry I sanded over the areas I had applied the layer of soap. You can sand a little or a lot to get whatever look fits!


5. I furthered the aged and weathered look of my wooden letter by applying a thin layer of brown paint with a rag onto the top coat of paint. Rubbing the paint into the cracks of the peeled paint and applying more in the corners, etc. Just apply and wipe, dab - repeat to achieve the depth of colors that you like.


And that's it! A beautifully aged piece that is new but has all the character and style of a one of a kind treasure!
Enjoy!

Mini Closed Umbrellas

Mini Closed Umbrellas:


What you'll need:

- tissues know as Chinese Paper
- wire
- glue
- beads
- other parts for the details

How to do it:

1. With the tissue, cut a circle of 10 cm diameter. 


2. Fold the circle in half into two, then four ... then eight, to have 16 parts. There are eight folds. To be able to see them better you can fold one fold on once side then the next on the other side.


3. Cut some wire about 8 to 9 inches long. Make a cross in the middle of the circle, this will be where you poke the wire through.


4. Put glue on the main and most visible lines on the circle.


5. We divided each of the four parts, leaving a total of eight parts on the umbrella.


6. Flatten the folds of the umbrella, then turn it upside down. Cut the top edges.


7. Slowly twist the umbrella close into the shape of a closed umbrella.


8. Cut another strip of paper and glue it to one side, then circle it around the umbrella. Once you've made a full circle glue it.


9. Once you've finished, you may add some details to make it look more like an umbrella.


Aren't these cute?

Enjoy!

DIY Watermelon Shorts

DIY Watermelon Shorts:

Nothing screams summer quite like watermelon. Whether you want to eat it or you prefer to wear it, watermelon is the epitome of the summer season. These DIY Watermelon Shorts will make you the hit of any summer party and they are super easy to make.
What you'll need:
- a pair of old white shorts or a faded blue denim shorts
- green and coral RIT dye (if you can't find coral, you can mix orange and red together)
- black fabric pen
How to do it:
1. Begin with the coral dye. Read the instructions carefully and dip the bottom half of the shorts at the line where you want the actual watermelon color to be. You need to dip the fabric in the dye for about half an hour. You can check your progress and stop whenever they get to the color that you want. Rinse thoroughly.
2. Now the green. Do the same thing with the green that you did with the coral only on the top where you want the rind to be. Follow the dye instructions carefully. 
3. You may want to wash and dry them when you finish dyeing them and once they are dry, take the black fabric pen and draw seeds on the coral section. 
Voila! You have a cute pair of watermelon shorts that cost very little and will look great all summer long.

Enjoy!

Glamourflage Coasters

Glamourflage Coasters:

DIY_Glamoflauge_Coasters_002

What you'll need:


DIY_Glamoflauge_Coasters_012
How to do it:
Choose your favorite acrylic paint colors, use the tape to mask off the edges if necessary (I just went for it, I’m crazy like that!).
DIY_Glamoflauge_Coasters_010
 Give each color a few minutes to dry before applying the next.
DIY_Glamoflauge_Coasters_011

DIY_Glamoflauge_Coasters_009
Finish off with a gloss varnish like this one or glossy Mod Podge for high shine.

Enjoy!

Vintage Mason Jar Vases

Vintage Mason Jar Vases:

What you'll need:

 mason jars
chalkboard paint (you can check out the tutorial for chalkboard paint here or buy it in store)
Paint (You could use craft paint or spray paint)
Sponge brushes 
Clear spray paint
- Sand paper or block
pretty lids {optional}

How to do it:

1. The very first thing I did was paint them with chalkboard paint. I wanted the black so that when I distressed it at the end the black would show through and give it that shabby look I was going for. 

2. Once the chalk paint was completely dry I started to paint the jars the colors I wanted with just regular old craft paint {again you could use spray paint if you would rather}. I chose the light blue, coral, mint and yellow because they reminded me of  summer and that is exactly what I wanted them for. The perfect pop of color. 

3. This is after 3 coats of the colored paint. 

4. Now they looked pretty but they looked a little too clean for me so I got out my sanding block and started roughing them up so you could see the black showing under.


5. The last thing I did was spray them with a clear spray paint to seal them up so the paint would not chip anymore and so they would be protected.


Fill them up with some water put pretty fresh  flowers in them and you have the perfect center piece, decor item, or statement piece to your home or party. 


Enjoy!

DIY Terrarium Ornament

DIY Terrarium Ornament:


What you'll need:

-  Clear Glass Christmas Ornament
- Mason Jar Lid
- Moss
- Sticks
- Crepe Paper Flower
- Wine Bottle Cork
- Thread


How to do it:

1. Remove the silver hook from the top of the Christmas ornament.

2. Use the mason jar lid as the platform for the glass ball, and to offer some stability while you create.

3. Fill the glass ball with moss and sticks.

4. Make your own crepe paper flowers to put in the glass ball for a burst of color.

5. Seal the hole in the glass ball with a wine cork.


Enjoy!
Shop SheIn for the latest in Fall and Winter Fashions