Copy Cat Oreo Blizzard Recipe

Copy Cat Oreo Blizzard Recipe:

homemade Oreo blizzard

What you'll need:

- 8 oz whole milk
- 12 oz cream
- 1 Tahitian vanilla bean
- 1 1/2 ounces egg yolks (2-3 eggs, depending on size)
- 7 ounces sugar
- 1/2 tsp kosher salt
- 1 ounce Frangelico
- 12 ounces of your favorite Blizzard mix-in, like Fauxreos

How to do it:

1. In a medium pot, bring the milk and cream to a boil together with the vanilla bean. When the mixture begins to simmer, shut of the heat and cover with a lid. Steep for an hour.

2. Return the dairy mixture to a simmer. Meanwhile whisk the sugar gradually into the yolks in a medium bowl.  Whisk in the sugar and the salt bit by bit.

3. Once the dairy begins to simmer, fish out the vanilla bean and use a spatula to scrape out all of the heavily flavored cream from inside the pod. It's better to scrape out the vanilla pod while it's still warm.

4. Now, whisk some of the hot dairy mixture into the egg yolks, one ladle full at a time, until the egg mixture is quite warm. Then whisk the egg mixture into the pot of cream and turn the heat to medium or medium low.

5. Stir constantly, making sure to scrape all along the bottom of the pot to avoid allowing any of the mixture to curdle. You can use a thermometer to cook it to 140.

6. Immediately shut off the heat and strain the custard through a sieve and into a large bowl. Stir in the Frangelico.

7. Cool it in an ice bath and refrigerate overnight. 

turning a Blizzard upside down


Enjoy!

DIY Marbled Scarf

DIY Marbled Scarf:

etsy-how-to-clare-mcgibbon-marbling-marbled-scarf-large

What you'll need:

Water
- Alum (to set the paint into the fabric)
- Methocel (to thicken the water and create a “size” so the paint floats on the water’s surface)
- Household ammonia (helps thicken the “size”)
- Bucket
- Whisk
- Large, shallow plastic storage container (your container will serve as a tray and needs to be the size of the fabric you want to print on)
- Liquid acrylic paint
- Paper
- Paper towels
- Iron and ironing board
- Paint brushes
- Newspaper (or scrap paper)
- Large-toothed comb
- 100% silk or 100% cotton white fabric with a high thread count
- Golden GAC 900 (to help the paint adhere to the fabric)

etsy-how-to-clare-mcgibbon-marbling-marbled-scarf-001

How to do it:

Stage One: Preparation
For your designs to adhere to the fabric, you will need to pretreat using a mordant called alum. Alum has been used for centuries as a natural ingredient when dyeing fabric.
etsy-how-to-clare-mcgibbon-marbling-marbled-scarf-2thru4
Pretreat the Fabric
Dissolve ¼ cup of alum in a quart of warm tap water. (Note: double this mixture if you are dyeing a large piece of fabric, so the fabric will be fully immersed.)
etsy-how-to-clare-mcgibbon-marbling-marbled-scarf-5
Soak your fabric for 20 minutes and remove. Wring out the fabric in the sink or tub (do not rinse!) and let it line dry. Once the fabric has dried, iron it out completely, making sure to use the appropriate heat setting.
Prepare the Marbling Size
A marbling size is a suspension mixture which your marbling paint floats upon. I usedmethocel to create my marbling size, which will thicken the water just enough so the paint will rest on the water’s surface. There are other products on the market that you can use to thicken the water, but I prefer methocel because it’s quick to prepare and the mixture will keep for 3 days at room temperature or a week when stored in the fridge.
etsy-how-to-clare-mcgibbon-marbling-marbled-scarf-6through9
To create your size, slowly add 4 tablespoons of methocel per gallon of warm tap water to your bucket. (Note: double this mixture if printing on a large piece of fabric.) Blend the methocel and water with your whisk for about 5 minutes. You’ll feel the mixture start to thicken as you go. While you are whisking, add 1 tablespoon of household ammonia per gallon of water to the bucket.
etsy-how-to-clare-mcgibbon-marbling-marbled-scarf-010
When the 5 minute mixing frenzy has passed and your mixture is clear, pour it slowly into your tray and let it stand for at least 45 minutes. Rinse the bucket and fill it with cold tap water.
etsy-how-to-clare-mcgibbon-marbling-marbled-scarf-11
While you are waiting for the size to set, start mixing your paints. You’ll need to add an acrylic polymer (like GAC-900) to every paint you plan to use to ensure that your finished scarf is washable. The ratio should be one part GAC-900 per one part acrylic paint. For this project, consistency matters. You want the paint to be thin enough so that it will float on top of your methocel mixture – if it’s too thick, it will fall to the bottom. Aim to make all your paint mixtures the same consistency as whole milk, adding water if needed.
etsy-how-to-clare-mcgibbon-marbling-marbled-scarf-12
etsy-how-to-clare-mcgibbon-marbling-marbled-scarf-13
etsy-how-to-clare-mcgibbon-marbling-marbled-scarf-14
After the mixture has rested for at least 45 minutes, check to see if there are any bubbles. If there are, hold a sheet of paper that’s the size of your container on both ends and slowly lower it down until the middle touches the surface of the size. Let go of both ends and let it float on top of the size for a few seconds. Carefully peel it off the surface of the size and discard. You can use this technique to clear your size of any remaining floating paint as well.
etsy-how-to-clare-mcgibbon-marbling-marbled-scarf-019
Now you’re ready to start adding paint to the methocel mixture. To do this, take your paint brush and gently drop your first color on the surface of the mixture. You can place your drops at random or in a pattern to create different effects, but keep in mind that the more paint you put on the water’s surface, the less pastel your print will turn out. Don’t be shy if you have a large container; it’s going to take more paint than you think to cover the size’s surface completely. If you’re using a small container, take care not to add too much paint – if so, you will lose the surface tension of your size and your colors will sink.
etsy-how-to-clare-mcgibbon-marbling-marbled-scarf-15-18
Once you’ve added all the color you want, I recommend printing a test run on white paper to see how your paint colors may show on your scarf. Follow the same steps you took to remove the bubbles from the surface of your size, and this time, “pick up the paint” with your paper. If you like the results, you can lightly rinse the paper with water and lay it on a paper towel to dry.
Stage Two: Pattern-Making and Printing
Once you’re happy with the colors and arrangement, the fun really starts: it’s time to make your patterns. Experimentation is key – try any of the techniques below to make a pattern, or create your own!
etsy-how-to-clare-mcgibbon-marbling-marbled-scarf-20
Turkish Stone: Create different sized spots or “stones” with paint on your size. This is the beginning step to most other marbling patterns, and it’s the one you used above when you tested your paint colors on paper. Try using different tools, like a brush or dropper, to create drops in varying sizes. I like repeatedly tapping the brush with my index finger while moving across the surface to create smaller drops of paint. You can create concentric circles in your stone pattern by adding drops of different colors in the center of previous circles.
etsy-how-to-clare-mcgibbon-marbling-marbled-scarf-021
etsy-how-to-clare-mcgibbon-marbling-marbled-scarf-22
Back and Forth: Start with the Turkish stone. Next, draw through the size with an upside-down paint brush in a back and forth snake pattern. Repeat this movement in the opposite direction if desired.
etsy-how-to-clare-mcgibbon-marbling-marbled-scarf-024
Nonpareil: Create the back and forth pattern. Use your rake or a wide-tooth comb and draw it across your size in the direction opposite your back and forth pattern. Prepare for the psychedelic results!
etsy-how-to-clare-mcgibbon-marbling-marbled-scarf-025
Once you’ve created your desired pattern (I used back and forth), you’re ready to print on fabric! Holding the fabric on both ends, slowly lower it onto the surface so the center sags down and touches first. Let go, and let it rest for a few seconds. Carefully lift the fabric off the surface and put it straight into your bucket of tap water.
etsy-how-to-clare-mcgibbon-marbling-marbled-scarf-027
Slush it around in the water and rinse, being careful not to rub the fabric (or you might smear the design!) Gently wring it out and hang to dry.
etsy-how-to-clare-mcgibbon-marbling-marbled-scarf-large
Once your fabric is completely dry, you can heat-set the paint by ironing. Make sure to complete this step in a well-ventilated room – GAC 900, the fabric paint medium, can release fumes.
etsy-how-to-clare-mcgibbon-marbling-marbled-scarf-header
Hand-wash your fabric in warm water, air dry, and you've got a chic marbled scarf!
Enjoy!

Shell Spoons

Shell Spoons:

I know it's not summer, but some time ago, I saved a picture of shell spoons and thought it was a lovely idea to share with you! So I decided to look for the tutorial and I found it!
It's an old tradition to use shells for making spoons. They're not really suitable for eating - ragged edges make it dangerous - but they're gorgeous as mini scoops for sugar, salt, tea, or dry herbs.
So keep an eye out for pearly, pastel shells the next time you walk on the beach! You could find your new sugar spoon.

What you'll need:

- spoon-shaped shells
- different wires
- small pliers
- dremel for holes.

How to do it:

1. Pierce the shells 1-3 times with the dremel.
2. Cross the wires through the holes and twist them in different ways around each other.
3. Twist the ends in like snails with the pliers.

spoons made of shells /{adorable gift for the chef or foodie} #DIY

That's it!

Enjoy!

Pop Up Typewriter Name Card

Pop Up Typewriter Name Card:


What you'll need:

- x-acto knife
- cardstock + cutting board
- computer
- printer

How to do it:

1. First, get all your materials in place. You'll need two identical pieces of card stock cut to 5 1/2 inches long by 4 1/2 inches wide. 

2. Now you need to print your typewriter and typewriter paper. We printed on white card stock but regular paper is also fine.

3. Cut out your typewriter using an Xacto knife. Fold one of your pieces of card stock in half. Flatten it back out. Paste your typewriter so that the bottom is 1/2 an inch from the middle crease.
4. Now, use an Xacto to cut lines around the two sides of your typewriter. Extend the cut 1/2 an inch past the top of the typewriter. Give that pop-up a test. 
5. Next, you need to add your paper. Simply cut a thin line through the paper part of the typewriter and slip your printed name card right in. 
6. Lastly, take your second piece of card stock and paste it to the back of the pop-up. Done!
Here are some more Pop Up Name Cards:
Enjoy!

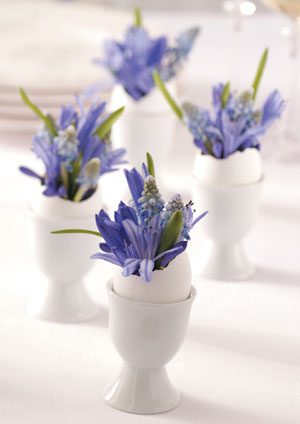
Flowering Egg Shells

Flowering Egg Shells:

Flowering Egg Shells

What you'll need:

- eggs
- egg cup
- flowers

How to do it:

1. Crack the narrow end of a raw egg and break away a small portion.

2. Empty the contents of the egg. Rinse the shell and let dry.

3. Create a larger opening by breaking away more of the shell. Place a small piece of wet floral foam inside the shell. Fill with water. Insert small, fresh spring flowers (such as grape hyacinth and agapanthus) into the floral foam. Set the flower-filled shell in egg cup.


Enjoy!

Pom Pom Dandelion

Pom Pom Dandelion:

What you'll need:

- yellow thread
- green thread
- stick


Enjoy!

Romwe Generic Fall & Winter

DIY Inspiration: Mini Hobbit Hole

DIY Inspiration: Mini Hobbit Hole

Well, I'm not exactly sure how to make this, I've never tried and I would love to have the tutorial.
I would really appreciate it if you could leave a comment and let me know how to make one of these adorable hobbit holes.


(I would probably use some old erasers to make the bricks.)

Thank you from a huge Hobbit and LOTR fan!

I found a tutorial on this site, if it interests anyone. Unfortunately, it isn't the one i'm looking for.

Nail Polish Flower Crown

Nail Polish Flower Crown:

What you'll need:

- thin wire
- nail polish
- ribbon

How to do it:

With thin wire and nail polish to do some pretty flowers

Enjoy!

DIY Hair Bows

DIY Hair Bows:


What you'll need:

- Fabric or Felt
- Glue gun
- Hair clip

How to do it:


1. Get fabric or felt. The tutorial above uses felt.

2. Cut out a rectangle and a small strip.

3. Scrunch up the rectangle to get the shape of the bow.

4. Attach the strip of felt around the center of the bow and secure it with hot glue.

5. Add a clip at the back of the bow.

DIY Hair Bow

Enjoy!

Test Tube Plant Holder

Test Tube Plant Holder:

What you'll need:

- test tubes
- test tube holder
- flowers/plants


Hell Yeah!


Lovely right?

Enjoy!
Shop SheIn for the latest in Fall and Winter Fashions