

Votive Castle Lantern
Votive Castle Lantern:

What you'll need:
 Lova's World - Castle (3375 KB)
Enjoy!
What you'll need:
- Printouts downloaded from this webpage
- Tissue paper to use for the windows
- Scissors
- Xacto Knife
- Paper glue
- LED votive (some flicker like real candles)
DOWNLOAD CASTLE PRINT-OUTS HERE:
Lova's World - Castle (3375 KB)
How to do it:
1. Download and print out the files attached to this post. Print two copies of the page for each castle you will make.
2. Use scissors or Xacto knife to cut out four castle sides.
3. Using Xacto, cut out the little windows from the castle sides.
4. Cut pieces of tissue paper a little bigger than each window and glue the tissue to the back side of each castle wall to create a cute little window.
5. Glue the four sides of the castle together.
6. Place your new lantern over your LED votive and enjoy!
http://www.sweetpaulmag.com/crafts/lovas-world-castle-votive-lanternEnjoy!
Moon Phase Wall Art
Moon Phase Wall Art:

What you'll need:


What you'll need:
-20" long 2x4
-silver gilding paint
-black paint
-moon phases template (you really only need to print out one here)
-picture hanging hardware (not shown)
-silver gilding paint
-black paint
-moon phases template (you really only need to print out one here)
-picture hanging hardware (not shown)
-large & small paint brush
-pencil
-hammer (not shown)
-pencil
-hammer (not shown)
How to do it:
1. Cover the board with black paint. You can water yours down so that it acts more like a stain than paint.
2. Cut out the moon phases template, and on the back of the template, scribble with a pencil along the border of each shape. This will prepare the shapes for a graphite transfer.
3. Place the template right side up onto the board. Now trace around the shapes with a pencil or pen. When you lift the template you should see a graphite outline of the moon phases. You may use the same template, flipped upside down, to do the other half of the board too. The scribbled pencil marks should hold up for at least one more transfer.
4. Use a fine paint brush to fill in the outlines of the moon phases. Allow a little bit of the black to show through, and your shapes will look even more like moon phases.
5. Mount picture hanging hardware on either side of the back of the board, and you're ready to hang your art!
I really love this!
Enjoy!
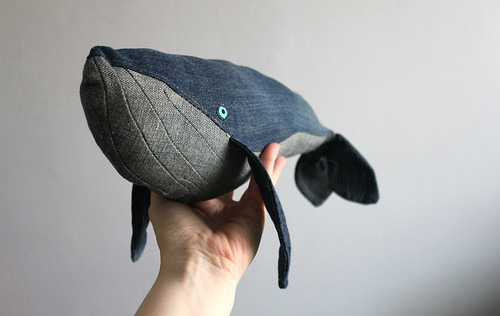
DIY Denim Whale
DIY Denim Whale:
So I wanted to share this really cute and amazing DIY with you that I found on this really great Finnish whale loving website. As I think it is such a lovely project to try, I want you to make one right now! Just follow the easy step by step tutorial and the images to get a super adorable denim whale!
For the tutorial in English click here!
Enjoy!
DIY Leather Phone Case
DIY Leather Phone Case:

What you'll need:
- Leather or fake leather 35×10 cm
- Lace or mesh 35×10 cm
- Chain or thread
- Glue spray
- Scissors
- Needle and thread
- Brooch or pendant (I had this from an old necklace)

How to do it:
1. Spray the glue to the back of the mesh or lace.

2. Glue it to the leather or fake leather and let dry.

3. Trim the excess from the edges.

4. Fold 1cm to the inside in one end of the piece and sew.

5. Join the sides from the inside out leaving room for overlap (about 7 cm) and sew them.

6. Turn the entire piece inside out.

7. Sew or glue the edges of the flap towards the inside.

8. Sew the thread or the chain to the top corners of the case and sew or glue the brooch or pendant to the flap.

Finished! And it's so pretty!

Enjoy!
http://planb.annaevers.com/en/diymovilcase/
What you'll need:
- Leather or fake leather 35×10 cm
- Lace or mesh 35×10 cm
- Chain or thread
- Glue spray
- Scissors
- Needle and thread
- Brooch or pendant (I had this from an old necklace)
How to do it:
1. Spray the glue to the back of the mesh or lace.
2. Glue it to the leather or fake leather and let dry.
3. Trim the excess from the edges.
4. Fold 1cm to the inside in one end of the piece and sew.
5. Join the sides from the inside out leaving room for overlap (about 7 cm) and sew them.
6. Turn the entire piece inside out.
7. Sew or glue the edges of the flap towards the inside.
8. Sew the thread or the chain to the top corners of the case and sew or glue the brooch or pendant to the flap.
Finished! And it's so pretty!
Enjoy!
http://planb.annaevers.com/en/diymovilcase/
DIY Pepsi Can Earrings
DIY Pepsi Can Earrings:

What you'll need:
- Pepsi can
- Scissors
- Small Coin
- Pen
- Hot Glue Gun
- Earrings
- Dimensional Magic Mod Podge

How to make it:


Enjoy!
What you'll need:
- Pepsi can
- Scissors
- Small Coin
- Pen
- Hot Glue Gun
- Earrings
- Dimensional Magic Mod Podge
How to make it:
1. Grab your closest Pepsi can, and cut out the largest logo. Decide what part of the logo you want to be on your coin.
2. Trace the coin onto the back of the can (in case you mess up), and then cut it out. Try to cut it a little bit smaller than you traced, that way it'll fit perfectly!


3. Hot glue the logo onto the coin.
4. Then use the "Dimensional Magic" and cover it completely. Get right up next to the edges. Let it dry from 3-6 hours. If you touch it, you'll get finger prints.


5. For this project, you have to bend the earring loop on the bottom so it's facing the opposite way. Glop some hot glue on your coin, and press the earring into the hot glue. Put some extra on for good measure.


Enjoy!
DIY Trendy Ottoman
DIY Trendy Ottoman:

What you'll need:
Tools:
- serrated knife
- scissors
- staple gun and staples
- cordless drill
- paintbrush


Enjoy!
Using entry-level upholstery skills, minimal tools, and no sewing, you can create these splashy little ottomans topped with graphic embroidered textiles.
Add elegance to your project with furniture-style casters. Simply attach to bun feet painted black for drama.
What you'll need:
Tools:
- serrated knife
- scissors
- staple gun and staples
- cordless drill
- paintbrush
Fabric: Cut into a circle 6-1/2 inches wider all around than the round plywood base.
Muslin: Cut into a circle 6-1/2 inches wider all around than the round plywood base.
Quilt batting: Cut 2 layers to the size of the plywood base.
Upholstery batting: Cut 2 layers to the size of the plywood base.
High-density foam: Cut to the size of your plywood round, using a serrated knife. The foam comes 24-inches wide. Use high-tack adhesive crafts glue to join pieces for more width.
Plywood: Buy one precut piece at your local home center -- check the woodworking aisle.
How to do it:
1. Set guidelines. Using a marker, draw a guideline 2 inches from the edge of the wood base. Mark four even points on the circle. Fold and press the muslin into fourths. Smooth muslin over the batting layers, turn upside down, then match up the folds in the muslin with the lines on the base. Start stapling the muslin around the wood base, keeping the muslin folds aligned with the marker points.
2. Add the fabric. Center decorative textile or fabric over the muslin, smoothing in place, then staple to the base as with Step 1, dividing into four sections and easing the fabric as you go.
3. Add embellishments. Add a decorative edge by stapling the trim piece to the base. Allowing 3/4 inch along trim edge, position right sides together, then staple through the waistband buckram to secure the trim.
4. Add some glam.Turn back the decorative edge and glue in place with fabrics glue. Add decorative embellishments such as beads and sequins if desired.
5. Finally attach feet to the base (paint them first) with mounting hardware. Screw hardware to the base, then attach feet. Add decorative casters for a final flourish.
Done!
Easter Egg Terrarium
Easter Egg Terrarium:

What you'll need:
- clear plastic egg
- moss
- dirt
- gold spray paint (optional)
- paper wire flower

How to do it:
1. Spray the colored egg part gold. Wait 24 hours to dry properly.
2. Insert a bit of wet dirt into the bottom of the egg filling about 1/3.
3. Add a bit of moss on top.
4. Dig your wire flower into the dirt.
Done!


Enjoy!
What you'll need:
- clear plastic egg
- moss
- dirt
- gold spray paint (optional)
- paper wire flower
How to do it:
1. Spray the colored egg part gold. Wait 24 hours to dry properly.
2. Insert a bit of wet dirt into the bottom of the egg filling about 1/3.
3. Add a bit of moss on top.
4. Dig your wire flower into the dirt.
Done!


Enjoy!
Subscribe to:
Posts (Atom)
